Construction:
Dress: I had a simple dress pattern that I had bought a while ago from McCall's (M6504 View A) that I used as the base dress. I added some lace edging along the collar, the shoulders and the hem. The dress was quite difficult to make despite the pattern being marked as easy. I had the most difficult time trying to iron out my seams without messing up the rest of the dress. I was able to get the zipper in (my first time whoot whoot!) but when I finally was able to wear it I realized that the back of the dress was much too wide for my shoulders. I also realized that my arm holes are too snug. I had to take in the waist quite a bit as well. Alas, it is an ill-fitting dress but I can learn a lot from the mistakes I made while making this dress. I probably won't remake it as I would rather put more effort into making different cosplays.
 |
| Zipper |
 |
| Adding lace |
Ears: I drafted my own ear pattern. I made them a little too thin for my liking so the next time I will make any sort of ears in that shape I will make them wider. Making the ears was not hard. My first iteration I decided the attach them to a white headband. Sewing them to the headband was a little strange. They were not actually fixed to the headband so they can slip all the way around. This made them easy to adjust when they are on my head. When I tried these ears with the bow however I realized that there was too much going on. I tore apart all my work and sewed the ears onto little individual combs instead.
 |
| First iteration of the ears |
Gloves: After many failed attempts at drafting my own glove pattern I finally made one that I deemed acceptable! Believe it or not readers, glove patterns are really hard to draft! They typically include three pieces, the thumb, the trank (the main part of the glove) and the fourchettes, which are little pieces of fabric that go in between the fingers and allow for better movement. I followed a couple of different methods that can be found here and here. I used the latter tutorial as the pattern that I came up with was the better one for me. I had to do some serious editing though. The thumb and the thumb piece hole where the first things to be perfected. After that I got the right width for the pattern to go around the hand, the points where the web of my fingers began relative to the thumb and the right index finger. After that I started measuring my other fingers. It took me a few mock ups after each design to see how I was doing it wrong. I made six versions of the pattern before I felt it was good enough to use.
I now have a pair of awesome gloves! The gloves are made with the same material as the dress along with the same lace edging for the cuff and an elastic wrist. Once I figure out how to go about it, I will post a glove making tutorial :)
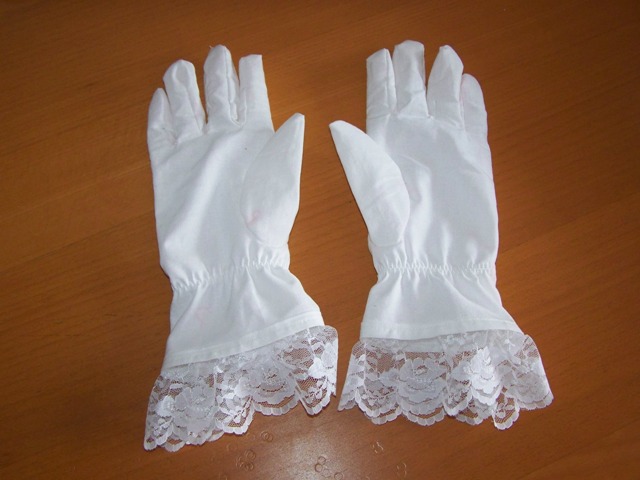 |
| Finished gloves |
Underthings: I used plain white tights that I had lying around to make my legs white. I bought a pink and white crinoline to put under the dress. At first I was going to make the dress shorter but I decided that with the crinoline at my hips the length would be fine.
Shoes: I bought my white shoes for really cheap at Value Village. Second hand shops are great for buying costume accessories ;)
Bow: I wondered how I was going to attach the jewel to my head. Originally I thought I was going to make it out of clay which is heavy. I then decided to make a stiffened bow that would support the clay. I changed my mind about the clay jewel however when I went into Dollarama and found the perfect little red jewels! I bought them and attached one to the bow using super glue.
The bow is made of the same fabric as the dress and gloves. It is stiffened on both pieces and reinforced with a wire inside. I attached a long white ribbon to the back so that I could attach it to a high ponytail or something like that.
Later on I decided that I wanted to have to red jewel on my forehead as the jewel wasn't seen claerly on the bow. I took it off the bow and tested it on my forehead using spirit gum. Spirit gum did the trick!
Bow: I wondered how I was going to attach the jewel to my head. Originally I thought I was going to make it out of clay which is heavy. I then decided to make a stiffened bow that would support the clay. I changed my mind about the clay jewel however when I went into Dollarama and found the perfect little red jewels! I bought them and attached one to the bow using super glue.
 |
| Basic bow |
Later on I decided that I wanted to have to red jewel on my forehead as the jewel wasn't seen claerly on the bow. I took it off the bow and tested it on my forehead using spirit gum. Spirit gum did the trick!
I wore part of this costume to a final exam this past summer because that was the night that Otakuthon started. I basically rushed over to the convention center and completely forgot about my gloves! Everyone at the exam thought that I was so cute in my dress. Someone even asked if I was eloping lol! It was really a lot of fun wearing this costume. Mokona is such a cute and fun character and I had lots of fun playing him. It is also quite comfortable once I get used to the smaller than normal armholes. The only pain about this dress is that it wrinkles so easily! Next time I use fabric like this I won't chose a pattern that has crazy fitting to it!
 |
| Completed Mokona Cosplay |
No comments:
Post a Comment